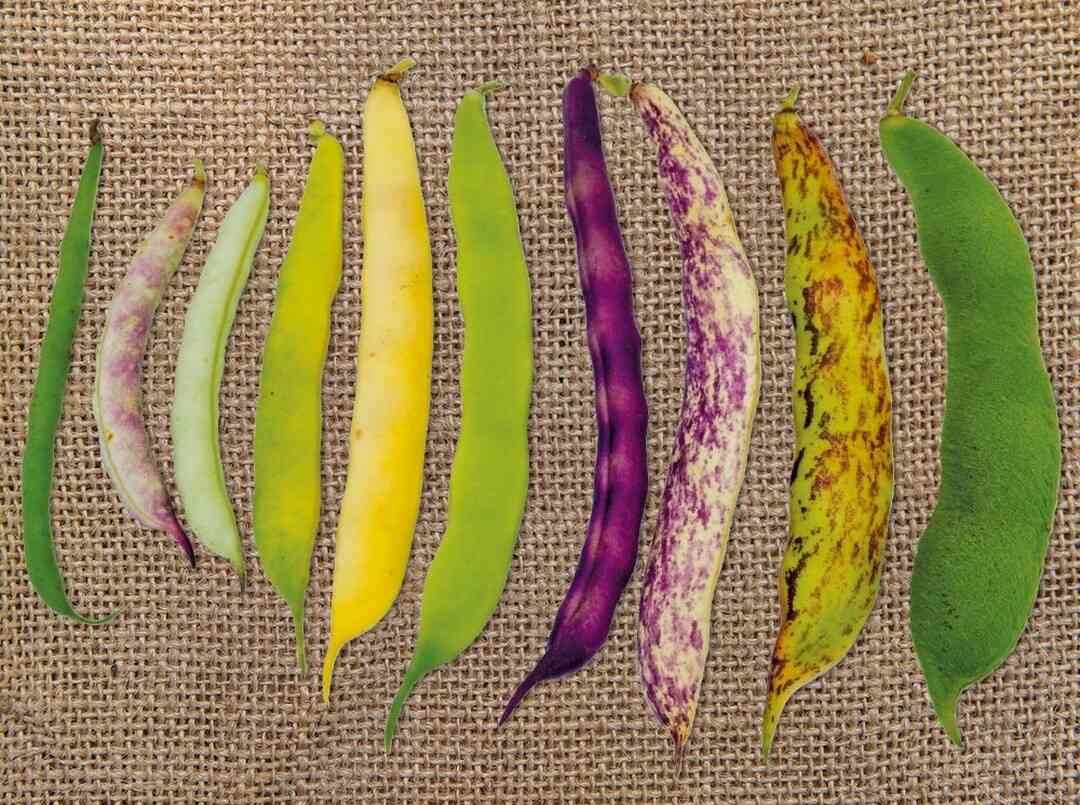
Did you know that beans have been feeding humans for over 7,000 yrs? That’s right, beans are one of the oldest and most versatile crops, providing essential nutrients and flavour to countless generations.
Growing your own beans not only helps you build healthy soil in your garden, it also provide you with a nutrient-rich diet – and they can reduce your carbon footprint and food miles as well!
Now, how about growing beans right in your garden? They’re tasty, easy to grow and come in a huge range of varieties. In this post, we’ll walk you through the process of growing beans at home.
Step 1: Choosing the Right Bean Varieties For Growing Beans at Home
When it comes to home gardening, not all beans are created equal. There are primarily two types of beans you could consider growing at home – bush beans and pole beans.
- Bush or Dwarf Beans: Bush beans are great for small spaces. They grow compactly, bushy and don’t need a trellis for support, so they’re pretty low-maintenance.
- Pole or Runner Beans: On the other hand, pole beans climb like vines and require a bit more attention. They need a sturdy trellis or poles to climb on, but they’ll produce over a longer period than bush beans.
Step 2: Understanding the Ideal Growing Conditions
When To Grow Beans in India?
- If you’re in a warmer part of India, lucky you! You can plant bean seeds and seedlings all year round, with less pest troubles during the cooler months.
- In temperate and cooler regions it is best to grow beans from Spring through Summer.
Sunlight Requirements
Beans love the sun. They need at least six hours of sunlight a day to produce a bountiful harvest. So make sure to choose a sunny spot in your garden.
Soil
Beans aren’t too picky about soil, but they do prefer well-draining soil. A neutral pH between 6.0 and 7.0 is what they like. Adding compost or organic matter can improve soil fertility and give your beans a good head start.
Step 3: Sowing Seeds and Planting
- Prepare Your Bean Seeds: If you’re starting with seeds, here’s a little trick – soak them overnight in water. The outer coating of bean seeds is pretty hard, so soaking them will soften it and improve the chances of them sprouting.
- Planting the Seeds: If you’re directly sowing the seeds in the ground, place 3 to 4 seeds about 5cm deep. Once done, cover lightly with soil and give them a good watering. For those who prefer seed trays, plant 1 to 2 seeds in each cell, around 3cm deep.
- Set Up a Trellis: Once your seeds are planted, it’s time to set up a trellis for climbing beans. Make sure you do this before sowing to avoid damaging the roots as they grow.
- Planting in Pots: If you’re tight on space, don’t worry! Beans can happily thrive in pots that are medium to large in size, roughly about 30-40cm deep. Just make sure to fill your pot with a quality potting mix. If you’ve chosen to grow climbing beans, you’ll need a support trellis and It’s a good idea to do this before planting to avoid disturbing the roots of the beans later on. Now, if you’re planning on growing bush beans, they are just fantastic for pots.
Step 4: Providing Care For Bean Plants
- Nutrients: Beans love nutrient-rich soil, so before you plant, make sure you enrich your soil with homemade compost or manure. It provides the perfect cocktail of nutrients your beans need to thrive. If you’ve done a good job enriching your soil before planting, your beans shouldn’t need any additional fertiliser during the growing season.
- Watering: If the weather is hot and dry, you need to water your bean plants daily. But if it’s mild or rainy, you can cut back a bit. Just remember, overhead watering is a no-no. Overhead watering can cause fungal problems, which can harm your plants.
- Pest: Always keep an eye out for usual suspects like aphids and beetles. They can be a real menace. If you spot any, act fast to stop them in their tracks. And here’s a cool tip – a homemade solution of garlic and water can be your secret weapon against these little critters. Strange as it might sound, it works!
Step 5: Harvesting Your Home-Grown Beans
Usually, the beans will be ready to start harvesting about 10 to 14 weeks after planting. If you’ve planted bush beans, you’re in for a treat as they generally crop faster than climbing beans.
The size of fully grown beans can vary depending on the variety you’re growing. But as a rule of thumb, they should be full and crisp to touch. If you leave them on the plant too long, they will start to dry out and the skin will get thick.
Secret tip: keep picking your beans every 3 to 4 days. This trick encourages your plants to produce more flowers, leading to a larger and longer harvest.
Step 6: Collecting and Saving Bean Seeds for Future Planting

Towards the end of the growing season, leave a few pods on your plants and let them dry out. You’ll notice the pods turning brown and the seeds inside getting hard – that’s when you know they’re ready.
Now, harvest these dry pods and crack them open and remove all the seeds. Now, these seeds need to be dried a bit more before storage.
After they’re good and dry, put them in an envelope and don’t forget to label it with the variety name and the harvest date.
Bonus Tips and Tricks for Growing Beans at Home
- Avoid Overwatering: Too much water isn’t good news for your beans. It can lead to rotten seeds, yellow leaves, and poor growth. So, remember, when it comes to watering, less is more!
- Rotate Your Crops: Crop rotation can help prevent soil-borne diseases and pests. Try not to plant beans in the same spot two years in a row.
- Fend off Fungal Diseases: To keep those pesky fungal diseases at bay, it’s best to avoid watering your beans from above. And if you live in a high humidity area, make sure your plants have enough space to breathe.
- Extend Your Harvest with Succession Sowing: French beans grow pretty quickly, so to enjoy a longer harvest, try succession sowing. Just sow a new batch every few weeks throughout the spring and summer.
- Regular Picking is Key: The more you pick, the more beans your plant will produce. So, keep picking those tender beans and enjoy a long, fruitful harvest.


